Thursday, March 8, 2012

Sweet and Sour Chicken


I must confess,  I made this for dinner the other night and didn't think it would turn out so I didn't bother taking pictures until after it was complete. I tasted it and ended up kicking myself for not taking the step by step photos of the recipe. Lesson learned and things turned out okay since  I ended up liking it so much, I made it again the next day minus the quinoa for my lunch and took the pictures then.

I must note that this recipe has arrowroot powder which is a thickening agent. It is not listed in the PINK method book as an accepted item, I however did ask Cynthia about it when I used it in this alfredo recipe and she said that it was fine to use as a thickening agent.

Sweet and Sour Chicken
2 tbsp tomato paste, no added sugar
1 tbsp Bragg's Aminos or low sodium soy sauce
1/2 tsp arrowroot powder
1/4 cup white vinegar
1.4 cup water
1-2 medjool dates pitted
8 ounces boneless skinless chicken breasts cut into chunks
2 cups assorted vegetables chopped (I used mushrooms, zucchini, peppers, onions, carrots)

Method
Start by browning your chicken until cooked through

While your chicken is cooking make your sweet and sour sauce.

Add the tomato paste, Bragg's, Vinegar, Arrowroot powder, water and dates to your blender and blend until smooth.

Note: You may want to chop your dates first, I added my pitted dates whole into the blender and they didn't chop very well. Everything worked out once I cooked the sauce because the dates just kind of dissolved when heated.

Once the chicken is cooked add your vegetables and saute until they are soft.

When the vegetables are soft, Pour your sauce into the pan and let cook until it thickens. It shouldn't take very long.

Taste your sauce, I ended up adding just a dash more Bragg's to mine but I didn't want you all to try it and get overwhelmed by the taste so you be the judge.
Note: this picture was my husband's meal,  it has pineapple added, I don't think pineapple is PINK approved , at least it isn't listed as a slow fruit,  so just leave it out and you should be sitting PINK

Serve over quinoa or brown rice.

Enjoy

Tuesday, March 6, 2012

Vegetable Lasagna


I spend a lot of time thinking about food...not sure that is a good thing, maybe that is why I got to the place where I am now, desperately needing to lose weight for my health. Food is just something I tend to always have bouncing around in my head however now that I am on PINK, instead of thinking about bad food, I have shifted to thinking about good foods and how I can prepare them in new and exciting ways. Well this is one of those foods I had bouncing around in my brain.

It all started when I made this Roasted Butternut Squash Pasta Sauce. Prior to PINK, I had made a fabulous lasagna using a jarred butternut squash sauce, ricotta cheese, mozzerella cheese and of course pasta. It was great but totally off limits with my new healthy eating plan. I wondered if I could somehow recreate the dish without cheese and it just popped into my head, "What if I used pureed cauliflower instead of the ricotta, it sort of has the texture of a creamy ricotta." I knew I was on to something and I had to try it out. The results were great.

Vegetable Lasagna (makes enough for 2 servings)
1/2 cup roasted butternut squash pasta sauce (could sub marinara sauce also)
2 small zucchinis sliced lengthwise
3/4 cup cauliflower puree
1 cup chopped spinach
1/2 cup chopped onions
1/2 cup chopped mushrooms
1 egg (I used to in the pictures and had way more puree than I needed)
Italian seasoning
Salt
Pepper

Method
 Start by cutting up and steaming your cauliflower (if you have left over puree, use that instead)
Puree your cauliflower in a blender or food processor
Add in your desired amount of salt, pepper, and Italian seasoning to the cauliflower puree
Note, I made way to much cauliflower puree than is needed, only use one egg or you will have a runny mess with tons left over
Let the cauliflower cool slightly then add in your egg to the ricotta and stir to combine. Make sure your cauliflower isn't to hot or else you will end up with scrambled eggs, you don't want that. The egg will act as your binder and help to hold the dish together.
While the cauliflower is cooling, prepare your spinach and mushroom filling.

Saute your spinach, mushrooms and onions in a mist of olive oil. It will cook rather quickly, you just want the spinach to wilt slightly and the mushrooms and onions to soften.
Thinly slice your zucchinis lengthwise, these will take the place of the traditional pasta.

Assembly


You will assemble just as you would a normal lasagna, just in case you haven't made one before, I'll walk you through it and give you some alternatives.
Begin by spreading some of your butternut squash pasta sauce (or marinara) on the bottom of you pan. I used to individual size spring-form pans but use what you have, a loaf pan would work great also.
Layer your thinly sliced zucchini on top of your sauce
Spread your cauliflower mash on top of your zucchini
I totally forgot to take this picture, use your imagination to sprinkle some of you spinach mushroom filling on top of the cauliflower (you could also use lean ground turkey or beef as a filling, especially if you are using marinara, this would make for a more traditional lasagna)
Top with more pasta sauce and repeat your layers over and over until your pan is full making sure to top everything with a little more sauce.
Bake at 350 degrees about 30 minutes

Remove from oven and let cool for about 5 minutes before serving. This helps to keep your lasagna from being to runny.


Enjoy.

Note: I am putting this under primary recipes because I believe the squash sauce would be considered a carb however if you were to sub marinara sauce for the squash sauce, I believe it would be reset friendly. I also considered the egg in the cauliflower mash my protein but since it was split between two servings, I really should have added more protein to this meal.


Monday, March 5, 2012

Roasted Butternut Squash Pasta Sauce


Eating healthy doesn't have to mean boring bland food...quite the contrary. I got my creative juices flowing yesterday in the kitchen and boy was I pleased with the results. I set out to recreate a butternut squash pasta sauce I used to buy at Costco, the results were fantastic and oh so easy to make. Serve it on top of some Zucchini noodles made using the Saladacco along with some grilled chicken and you are set with an easy peasy, gourmet dinner or put in a little more effort and make a vegetable lasagna like I did. Yep, a deliciously amazing vegetable lasagna, I will share how tomorrow.

Roasted Butternut Squash Pasta Sauce
1.5 lbs of butternut squash
4 cloves of garlic
Sea Salt
Pepper
Mrs. Dash original
Olive oil
Almond Milk (I ended up using about a cup, you may use more or less depending on how thick you want your sauce)

Method


Peel the butternut squash and remove the seeds (just a note, you can buy peeled and seeded butternut squash at the grocery store if you want to skip this step)

Cut the squash into bite size pieces.

Spread the squash out on a cookie sheet along with your garlic and mist with a little bit of olive oil. Sprinkle a little salt, pepper and Mrs. Dash on top of your squash.

Roast at 350 degrees for about 30 minutes or until it gets soft. Cooking time will vary depending on how large your squash is cut.

Remove the roasted squash from the oven and transfer the squash to your blender.


Start by adding 1/4 cup of almond milk to your squash and start pureeing. Add in more milk as needed until you have reached the consistency that you desire.


Serve over zucchini noodles or make this yummy vegetable lasagna once I get the recipe posted! How is that for a tease?

By the way, my kids love this sauce, I serve theirs over cheese ravioli's and they are happy as clams. Because of the color, they think it is cheese sauce and I just keep my mouth shut. It is my little secret that I just shared with you all.

Enjoy!


Sunday, March 4, 2012

Pumpkin Spice Quinoa Granola


I have been on a quinoa kick lately. I have been buying quinoa in the bulk section at the grocery store lately and it is so cheap, something like $3.50 a pound. A pound of quinoa goes a long way so it is very economical which is a plus because health food can be expensive. I was researching quinoa recipes the other day and it said that a lot of people eat it at breakfast as a hot cereal, like oatmeal which has intrigued me but I have yet to try it. I also found lots of recipes for homemade granola that use quinoa but many of them have lots of sugar, syrup, dried fruit, nuts, and tons of oil. It got me thinking, I wonder if I could make it without the oil, fruit, nuts etc. which would make it more PINK friendly. I worked off a basic recipe that was close to being PINK friendly which can be found at Clean Eating Chelsey and tweaked it to make it my own and more PINK friendly.

So where does this fit into the PINK meal plan? I ate this for breakfast and counted it as my slow carb. For the protein I added in some greek yogurt. I also counted 1/3 cup as  a serving of slow carb because in the PINK method book it states that 1/2 cup cooked quinoa is a serving, When it bakes down and crunches up, it does shrink a bit so that was my best estimate as to how much a serving is. I approximate I will get 5- 1/3 cup servings from this recipe.

Pumpkin Spice Quinoa Granola
3/4 cup quinoa
1/2 cup quinoa flakes (could sub old fashion oats)
4 medjool dates chopped into a paste
1/2 cup pumpkin puree
3 tbsp chia seeds (could use flax seeds or leave them out)
1/4 almond milk
2 tsp vanilla
1 tsp cinnamon
1/2 tsp pumpkin pie spice
2 cups water

Method


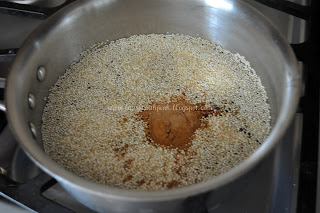
Start by cooking your quinoa in the water along with the cinnamon and pumpkin pie spice. It will take about 15 minutes for the quinoa to soften and the liquid to be absorbed/evaporate.

While the quinoa is cooking, pit your dates and chop them into a paste using your blender or food processor. If you don't have dates, you could use stevia, they are really only there to add sweetness.

Add your pumpkin puree to your dates, if you don't have pumpkin, I bet smashed bananas would work well also.

Add in the chia seeds and almond milk, vanilla and stir everything together, making sure the date paste is mixed in so there are no large clumps of dates

When the quinoa is done, add it to your pumpkin mixture and stir to combine

Add in your quinoa flakes or oats if you prefer and stir to combine

You should be left with a gooey sticky mess

Spread the quinoa pumpkin mixture out on a cookie sheet that is lined with a sil-pat (silicone baking sheet) or parchment paper

Bake at 350 degrees for 15 minutes

After 15 minutes of cooking, take out of the oven and break up the mixture into clumps using a spatula

Return to the oven for 15 minutes and stir again. Continue this process until the granola has gotten crunchy, mine took about 1 hour or so. As it cooks the granola  will darken. It will also get slightly crunchier as it cools so be sure that you don't over back the granola or else it will have a burnt taste.

Eat with some Greek yogurt or some almond milk, like you would cereal, however this is not an overly sweet granola like some granola . Feel free to add in nuts and dried fruit if you like just be careful because those items up the calories of this granola quickly and dried fruit really does contain a lot of sugar, especially the kind you find in the store. I also am not a PINK expert but I am not sure how PINK friendly those items would be, that is why I left mine fairly plain.

Enjoy!


Related Posts Plugin for WordPress, Blogger...